Sunday, August 24, 2008

I'm back and cleaning up the cobwebs that are growing in the corners of my blog!!!

Wow... it's been awhile since I've been here. I can't believe it's almost the end of August already! Kids start school today. I now have 2 in high school and one in middle school. Where is the time going??? I know I've been a busy little bee with all the projects I've done over the last few weeks. Here they are:

First up - a card I did trying something new. I'm pretty happy with it except for the writing I did on the front. I should have used a font. The kites on the card are all attached using pop dots and the kite string is actual string from a real kite! The kite tails are my attempt at doodling! LOL All in all, I think it turned out cute for my first one.

Front of card:


Inside of card:


Credits: Kites made using Penny Springmann's Summer Fun collection: solids and alpha
Cloud paper by Amy Cheeseman
Grass on front of card is from Penny’s Summer Fun Collection: Hopscotch
kite template by me
the “wood” on the kites was done using the pen tool and then an inner bevel
font: 2peas Barefoot Professor.[/center]


Next up is a 3D card I made for my niece's bridal shower. The tent flap folds back to reveal the sports store gift card that I bought her. She and her future husband enjoy anything outdoor-sy. The lantern, moon, sign and fire are on pop dots. The skillet was an element that was on the shower invite that I received from her.


Credits: Kristin Cronin-Barrow's Gone Camping kit
Grass from Penny Springmann and Misty Cato's Chilling and Grilling kit
envelope template by Bree

and last for today is a Slumber party mini tin invite I made for my daughter to pass out. I found these cute little 4" tins in the $1 spot at Target. I removed the handles, sprayed the tin white and then added my side panels. Each tin will include the party information, mini bottles of nail polish, a nail file, nail decals, small bottle of scented lotion, mini flash light and of course, Chocolate!!!


Credits: MandaBean and Robin Carlton's Stop! Jammer Time kit

And that's it for today! Thanks for stopping by and taking a peek at my latest hybrid projects! Stop back soon and see what else I've done!

Sunday, July 13, 2008

FOBTY - 7/3 and 7/10

The July 3rd FOBTY (From our blog to Yours) on the Sweet Shoppe blog was a "what your fireworks say about you" quiz. Here are my results:


What Your These Fireworks Say About You


You are focused, single minded, and intense.

You don't let others see your intensity often, and when they do, they are quite surprised.


You burn brightly, but you also burn steadily.

You have the endurance to get the one thing you desire most.


Well, I am focused and intense but that is a side of me a lot of people see, esp. at work. As far as this part "You have the endurance to get the one thing you desire most", I would label it more as determination!! LOL....

The July 10th FOBTY posting was to blog about our favorite vacation spot or dream spot. I already blogged about my dream spot - Pompeii and Greece a month or so ago for the FOBTY, so this time I'll go with my favorite vacation spot.

We don't really do vacations in my house because my husband can't (read "WON'T) be away from his job. But I've started traveling and started the kids traveling. My favorite vacation spot is Ft. Myers Beach. It's sunny and warm and the kind of beach that you can just sit on all day and enjoy life! Although I need a beach chair, an umbrella to sit under (because I burn so easily), a good book/magazines, and something cold to drink. That is my favorite type of vacation!!!

Well, that's it for today. Hopefully I'll have some layouts or projects to post later this week. Have to go get Andrew ready for his trip - he leaves Tuesday evening.

See you all later!!!

Wednesday, July 9, 2008

Who says we're too old to play with paper dolls?? Whimsical Hybrid Card

Wow! I can't believe it's already July 9th! The summer is almost half over! Next Tuesday, my 15 year old will be flying alone to spend 3 weeks in Ft. Myers with my sister and a foreign exchange student. Should be an fun and exciting time for him!

Tomorrow I pick up Taylor from Girl Scout camp! She's been there since Sunday afternoon. Wonder if she's missing her Mom like her Mom is missing her??? I hope she is having a great time and will have some great memories to hang onto.

Last night I finished a Hybrid card that I started Monday night. It just wasn't working out like I envisioned until I had a brainstorm (anyone smell unexplained smoke Monday night? LOL).

At the beginning of summer, I bought a "Paper Fashions Fancy - Design your own Dresses" kit at Michael's for Taylor to work on when she was at her Grandparents while I worked. I gave her strict instructions that she wasn't to bring the kit home - it was only for Grandma's house. Well, I decided to go get the kit (and the cute little wire hangers that were included in the kit) and re-create the dress that wasn't working. The kit has great stencils that you can use to design your own clothes and accessories. Here's what I made with the kit:


Credits can be found here

And here's what the craft kit I used looks like:


My daughter LOVES playing with this and designing her own fashion clothing - she's 11. So worth the money I spent on it (although I had to use a 50% off coupon and only paid $12) and the $9.99 on the refill kit. And now I've found a way to play with it too!! I know as soon as Taylor sees my card, she'll be using her Design your own Dresses kit in a whole new way!!!

That's it for today - just remember to always keep on creating!!

Saturday, July 5, 2008

Tissue Paper Stretched Canvas Hybrid Project

These Tissue Paper Canvas project instructions were originally written by me on March 27, 2007 for a monthly project in a digital scrapbooking newsletter. These instructions were posted in several forums across digi-land, however, due to sites changing hands and the closing of sites, I felt it was time to bring my project instructions home and post them on my blog.


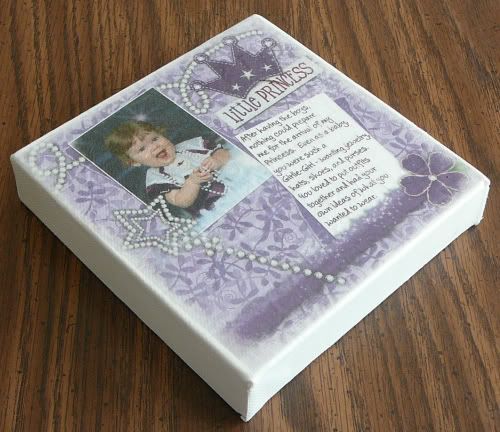
You can click on the preview for a look at the full sized, better quality photo.

Stretched canvas can be purchased at any craft store, art supply store or online from sites such as www.amoebaartshop.com. A google search will bring up other sites. Stretch canvas resembles Aida cloth (cross stitch material) which has been stretched over a wood frame for a 3 dimensional look. Stretched canvas is available in many different sizes from 4 x 4" to 12 x 12" and also can be purchased in rectangular sizes such as 5 x 7" and 8 1/2 x 11". The depth (or sides) of your canvas can also vary from 3/4" thick to 3" thick. For my project, I used 5x5" square stretched canvas with a 1 1/2" side. My canvas cost just under $4.

Once you have purchased your stretched canvas, you will need to measure the canvas surface. I know, I know... I know what you're thinking, "why did she measure the surface when she just said she bought a 5x5" canvas?" Just trust me when I say "measure twice, so you only have to print ONCE!" My canvas when measured was actually 5 3/8 x 5 1/2". Each canvas may measure a little differently than the previous one. You will need to convert your measurement into decimals in order to accurately resize your layout for printing.

Now, you have the daunting task of picking which layout you want to use for this project. To me, that was the most difficult! Since my stretched canvas was 5 3/8 x 5 1/2" which equals 5.375 x 5.5", I resized my ORIGINAL full sized 300dpi layout to 5.25 x 5.375" maintaining my 300dpi. (I used an online fraction to decimal converter to figure out my calculations. A good one can be found at www.webmath.com.) I did not want my printed layout extending over the edge of the canvas. In your program of choice, open a new image 8 1/2 x 11, 300dpi, and filled white. Copy and paste your resized layout onto this new blank image. Center your layout. This is an important step as it allows you to control the placement of your layout during printing. **Always do a draft test print (using grayscale to save on ink)on paper before doing your final print**

Next, we need to print our full color layout. We're not going to print on regular computer paper or even on cardstock. We are going to print our layout on tissue paper. To do this, you will need white tissue paper. Simply cut a piece of tissue paper about one inch smaller than the size of your computer paper. Lay the tissue paper on top of the computer paper you just test printed on and smooth it out. Use small 1 inch sections of tape (I used masking tape on one and scotch tape on another) to tape down all edges of the tissue paper. Completely tape down one side of your tissue paper before moving on to the next until all four sides are taped down. Do your best to have no wrinkles or bunching of the tissue paper. All edges of the tissue paper MUST be taped down and all tape MUST be flat.


**One of Janie (scrapastrophe) hints was to tape the sides of the tissue onto the back of your master paper so that you can print a little bit more on the edges and it gives a bit more tissue to play with. This will allow you to print up to an 8 x 8 sized tissue paper layout.**

Place your taped tissue paper in your print tray and print your layout using your printer's best print option. Allow your printed layout to sit for 24 hours before continuing with this project.

After your layout has cured for 24 hours, gently remove the tissue paper from the computer paper and cut around your tissue paper layout.

Again, check the size of your printed tissue paper layout on your canvas. Trim edges as necessary.

Position your tissue paper layout on your canvas. Lift the right half of your layout up and apply a thin coating of Matte finish Mod Podge glue on that half of the canvas with a foam brush. Very slowly roll the tissue paper back in place starting in the middle and working to your right. Go slow - gently touching and dabbing the tissue paper as it settles on to the glue. DO NOT press and RUB - this will smear your ink and may rip your tissue paper. Repeat for the left side of your layout. Air bubbles can be removed by poking the tip of a needle or pin into the bubble and then flattening the bubble. Allow to dry for 2 hours.
**I've also successfully used Plaid's scrapbooking glue pen with the dauber tip to adhere my layout to the canvas using the same technique as above**

Using a foam brush, apply several thin coats of Mod Podge glue over the entire surface of your layout and canvas making sure to get the edges of your layout. Allow to dry 30 minutes between coats of Mod Podge. Once completely dry, apply 2-3 layers of a clear acrylic sealer with a Matte finish, allowing each layer to dry completely.

These look GREAT displayed in a plate stand or hanging on a wall. If you have any questions about the instructions or would like to show off your creation using my instructions, please email me at wildblueeyez at comcast dot net. I'd love to see what you've done!!!

Sunday, June 29, 2008

FOBTY - Birthday Style

For the Sweet Shoppe Blog's "From Our Blog to Yours" (FOBTY), we are to blog about their favorite birthday year. That's a tough one. Each birthday year has been marked with different events to set it off from others. Sure, the obvious ones popped into my head first - my 16th birthday, I got my permit and then my license. My 18th birthday - finished high school and graduated, made the majorette squad at the college I went to, attended college. My 21st birthday year - got married, had my oldest, finished nursing school (in that order). My 24th birthday - had my youngest son, met my biological sisters, brother, and Mom. The list keeps growing.

I think I may have already experienced my favorite birthday year. I would venture to say the year I was 17 was my favorite. I was a typical teenager in the 80's. I had my license and was able to go out with my friends on the weekend - providing I had some babysitting money to spend. My weekday evenings were spent either at basketball practice, softball practice or majorette practice. I was captain with another girl of my softball team and majorette squad. Life was GOOD.

I have to say that turning 40 next February doesn't bother me in the least bit. It's just a number.

Thursday, June 26, 2008

Happy 4th of July! Um, almost!

For those of us in the US, 4th of July is fast approaching. Penny Springmann and I huddled secretively the other night to come up with something FUN and unique for her Workin' it Wednesday post at SSD and on her blog. My contribution started off as Penny asking me if I had ever done a pinwheel and if I could do one. "Sure, no problem" was what I told her. That alone should have told me that it would not be a picnic doing one! I'm the type of person who really jinxes herself by saying stuff like that. And trust me when I say that pinwheels are as easy as one would assume.

I knew immediately that I wanted to use the blue paper with the stars and the red dotted paper.

The first pinwheel I made using regular paper and was too big. It wilted like a flower in the middles of a hot summer day. NOT a pretty picture! And of course, I didn't have any matte photo paper and I KNEW cardstock would be too heavy.

So, I reduced the size of the pinwheel. Reprinted. Then I thought, "oh crud...how am I going to attach the pinwheel to the stick?" So, I googled pinwheels. I now know all there is to know about making my own pinwheels LOL. In the end, the lazy part of me won and I grabbed a pinwheel from the local dollar store, popped off their pinwheel and put mine on their red stick!!!

Here's my finished pinwheel:


I was so stoked at how it turned out.

And then I got this REALLY cool idea - that I was going to make Hybrid Rockets. I used full sized rolls of Lifesavers, wooden skewers and some mylar pieces coming out the other end for the "rocket" tails. I threw them together in like 30 minutes, start to finish. For the rocket labels, I just measure around the lifesaver and then how wide the original label was.

But my rockets were missing something. Penny asked if I could add some sort of cone top to them and Ta-da! They turned out adorably, if I say so myself!!! What do you think???


So, if you really like them and want to make some, pop over the Penny's blog. She's got a great little goodie for you that includes the pinwheel printables and the rocket printables. She done an awesome gallon paint can label for you too! This goodie assembled will make a GREAT centerpiece for picnics!

Well??? what are you still doing reading??? Go get it before it's gone!!! and be sure to drop me an email and show off your Pinwheels and rockets!!!

See you soon!!!

Tuesday, June 24, 2008

I have a Tuesday Treat for you!

Catchy title eh? It's Tuesday here in PA and I have a treat like the title says! I have for you the Onesie card template that I posted about the other day. It's all wrapped up in pretty paper with a giant pink bow on top. Ok, really it's just a plain ole zip file with a preview of my Onesie card, the Onesie card template, the full instructions as posted on my blog the other day (along with screenshots) and my TOU.

I'd love to see what you do with my template!

You can download the template HERE

On another note, be sure to check out the Sweet Shoppe Blog tomorrow - Penny Springmann will be workin' it on Wednesday and has whipped up something VERY cute and fun (with a little help from moi!). It features her newest kit called All American that will be released at the Sweet Shoppe on Saturday the 28th. I can't wait to see how everything turns out! Penny and I were feverishly emailing back and forth on Monday evening. We had so many emails go back and forth that my virus protection popped up on my screen. LOL.

I have some other Hybrid goodies that I will post later in the week. Be sure to check back either Wednesday or Thursday.

See you soon!

Saturday, June 21, 2008

Happy Saturday evening!

So the Sweet Shoppe's "From Our Blog to Yours" this time is a "What do the contents of your refrigerator say about you?" quiz. I'm actually scared of the results of this one. Here are my results:

What Your Fridge Says About You
You don't need a lot of stuff to be happy. There isn't a greedy bone in your body.

You are not careful with your money. In fact, you rarely think about how much you are spending.

You don't tend to be a very adventurous person, but you do surprise everyone now and then. You have a bit of a wild side.

You try to be responsible, but you don't always succeed. Your heart is in the right place though.

You are likely to be married - and very busy.


As always, these are hysterical in their analysis! Always good for a laugh!

In the scrapping world, I had a request from someone at DST asking if there was any way I could make a template from my onesie card. So today I worked on this request and am happy to say that I was able to make the Onesie card into a card template. I'll be posting that template along with the instructions on my blog sometime this week.

Penny Springmann emailed me and asked for some help on a special blog goodie. I think we're working on this for the upcoming Wednesday. It's a 4th of July goodie/give-away. So, if you haven't visited her blog, you may want to and keep checking back! Also, I'll be hosting Penny's Hybrid project on July 9th. Come check us out and see what the Maniacs are up to!

That's it for tonight! Take it easy!

Thursday, June 19, 2008

As promised! The Onesie card instructions!


This tutorial is written using PSE 4.0. I'm sure there are other ways of achieving the final result but this is how I did mine. Once you make one, you'll zip right through the making of another.

Open a 8.5" high x 5.5" wide 300dpi blank canvas. Using your rectangular marquee tool, select off the bottom half of your canvas.


Add a layer and fill with white - this will be the front of your card. Deselect. Hide the bottom layer.

Working on the top layer, paste in a background paper of your choice. Resize to your liking. this will be the color/pattern of your onesie.


Using the ellipse tool, draw a small white circle - this will be used to form the leg cut out. Position it along the bottom of your card. duplicate the layer and position this circle for the other leg cut out. duplicate once again and move this circle to top center of the front of your card - this will form the neck of your onesie. You can see your onesie taking shape. Reposition the bottom circles to your liking. See photo below.


Now, again select your rectangular marquee tool. draw a rectangle on your card to form the cuff of a sleeve. Add a layer and flood will with white. Deselect. duplicate this layer and position on opposite site to form other sleeve. Use your ruler at the top to help space evenly. This is what your onesie should look like.


Choose your polygonal lasso tool - make sure your feather is set at 0. Here is where I utilize the ruler markings at the top of my canvas.


Position the tool at the bottom outer corner of the "cuff" of the sleeve. Click once and draw a straight line in toward the body of your onesie. I counted the number of hash marks that I moved inward so that I can make the other side the same size. I came in 15 markings and clicked. you should have a straight line.


Then I went back out toward the cuff 8 markings (don't click!!) and then straight down to the middle of the white circle that is our cut out of our leg. this creates the side of your onesie. Click once and then move to the bottom of the card and click. Move to the outer edge of your card and click, continue up to the top of the front of your card and come across to above the cuff, click and then finish the area by ending where you started. See screenshots below.


Select your background paper layer and hit delete. choose the circle shape layer for that side and hit delete. Repeat the above directions for the other side and you should have this:


**If you aren't happy with the shape of your onesie, now is the time to hit the undo button and go back and reposition the shapes that form the leg of your onesie. I also adjusted the neck cut out to my liking.**


Let's clean up our onesie. Using your magic wand tool, select the circle shape that forms your neck cutout. Hit delete. While still selected, choose your background paper layer and hit delete. This will form the neckline of the onesie. Deselect. Repeat for both circle shapes that form the leg cutout.
At this point, you can decide if you like the cuffs on the onesie or not. I decided I didn't like my cuffs so I deleted these also using this technique. Delete those empty layers.


Next I found a round scallop element in my stash. I positioned it and resized it to fit around the leg cutout to resemble lace. Once you are happy with the look, select your onesie layer. Choose your magic wand tool and click in the space along your onesie. Select your scallop element layer and hit delete. this will leave only the "lace" along the cut out of the leg. Deselect. Repeat on the other side and again for the neck.


Add shadows to the scallops and the sleeve cuffs to your liking. Unhide your background layer. Don't worry about the "extra" shadow showing - this is good because it will give us cut lines when we print.


Add any embellishments you'd like to add to the front of your onesie or wait and add to the printed Onesie. Merge visible.


I added a 1 point black border to the edge of my card as a cutting guide. Print.


Steps for cutting out your onesie:
Using a ruler, I lightly scored the fold line (along the shoulders of my Onesie) and then folded my card. Using scissors, I cut the straight edges on the front of my onesie - the sides of the sleeves, along the sides. I only cut the front of my card at this time. Next I cut out the legs and neck. Use the front of your onesie to lightly trace with pencil the Onesie shape onto the back of your card.


Finish cutting. Do not cut through the "shoulders" of your onesie!


Embellish and there you have it! Your very own onesie card! If you have any questions, please feel free to email me at wildblueeyez at comcast dot net. Also, I'd LOVE to see your Onesie, so drop me a line!!!

Some Hybrid Fun!

Hello there! Happy Thursday to you! It's almost the end of another week. I can't believe it's almost the end of June already! I'll need to start buying Back to School clothes soon!!! Yeesh!

Today I have 2 hybrid projects I did the past week. I did a travel mug for a co-worker so she'd have something to remember the cruise she went on. The second project was for some hybrid fun on Sara Amarie's blog. It was very easy and fun to do. If you head over to her blog, you'll see another variation on this project that I did. Wouldn't it be cute for a baby or wedding shower? Or as a gift for that special teacher or Sunday school teacher? Sara made the suggestion of using different colored candles in the middle.

Doesn't the leaf look real? It's really a digital leaf printed out LOL


All's quiet here on the home front. My two youngest are away all week at their Grandparent's house. They watch them while I work but this week is Bible school week at the church. Taylor is almost too old for it and Andrew is a helper this year. They are old enough to stay home but trust me when I say it's much easier sending them there because then I'm not getting calls at work every 20 minutes saying, "Mom, he's_____" or "Mom, can you tell Taylor to stop _____". How soon does school start???? It's been quiet here - hubby and I are enjoying the peace and quiet but I miss them. I went after work and spent an hour with them before they went to Bible school last night. They'll be home Friday evening so I guess I'll enjoy my peace and quiet.

Well, that about wraps it up for today. Time to go get ready for work - it's 6:35am here in PA. I've got to figure out how to change the time stamp of my blog. Anyone know???

Sunday, June 15, 2008

Happy Father's Day!

A big Happy Father's day to all the Dads out there. Enjoy your day!

Today's blog posting is for the Sweet Shoppe's From Our Blog to Yours - we're to blog about our favorite summer activities. We really don't take vacations in the summer (or any other time of the year - but that's another post and something I've been working on fixing!!!). Hubby's job just doesn't allow him to get away over the summer for vacations. That's the beverage industries busiest time of the year. We usually hit the local amusement park atleast once a summer. We do alot of picnics with friends - you know the kind with hot dogs, bonfire with s'mores and mountain pies, and just generally enjoying each other's company. The kids will be busy running here and there.

This summer, Andrew - my 15 year old - will be flying to Florida to stay 3 weeks with my sister while she hosts a foreign exchange student. They will attend a morning session of school and then do all sorts of things throughout the evenings and weekends like hit Disney and biking on Sanibel Island.

Taylor will be attending Girl Scout camp July 6th through July 10th. It will be her first real time away from home but she'll be with her friend Carissa so I'm sure she'll be fine.

Justin - he'll be working the summer at Giant Eagle. When he's not working, he'll be off with his group of friends playing Wiffle ball or he'll be chilling here at the house.

Here are a few scrap pages I did this week:

This one is for the Cookie Challenge over at the Sweet Shoppe:

Credits: Splish Splash by Penny Springmann & Lauren Grier
Font: Bank Gothis Md bt

Credits: Sand In My Shorts by Julie Billingsley
Clouds from Penny Springmann and Misty Cato's Chilling and Grilling kit
Pool divider and journal tabs from Splish Splash by Penny Springmann & Lauren Grier
Font: 2Peas Beef Broccoli

For those of you who left comments about my Onesie card (see post below), I have the tutorial written (with screen shots) and will have it posted this week. So, stop back and see me!
That's it for today - have a good one!

Monday, June 9, 2008

Another Hot one here in PA - and sharing a layout and hybrid card

Yepp, it's a another hot one here in PA - it's in the mid-90's with a hot breeze blowing. The kids and I are hiding indoors although we did spend a little time earlier today sitting out in front of the house in the shade before retreating back inside. Today's my last day off and it's back to work tomorrow for me. Blah!
I managed to get a few things done this weekend - a hybrid card for the 52 card pick up workshop at the Sweet Shop and a layout about my father-in-law and his Hillbilly buddies. The hybrid card was inspired by a stamping site and was created almost entirely in PSE, printed and then the bow and "snaps" applied. I'm working on the tutorial with screenshots and look to have it posted here later this week. It really was fairly easy to do although the instructions written out seem a little long. I also did a coordinating envelope for the baby card and both are now safely stored in my designated card box.

Credits: Traci Reed's Sweet On You kit
Scallop element by Ksharonk designs
Font: 2Peas Shenanigans


Credits: Be Amused by Sara
Single frame by Penny Springmann
White Frame cluster by Welli Designs
Arrow (covered with Be Amused paper) by Mirranda Reinhardt
Font: Hiccips
That's about it for today. I need to go load the dishwasher and then maybe sneak in a cat nap. LOL