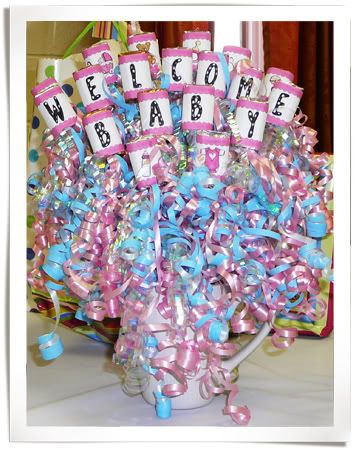
Here's my supply list and how I make mine:
Supplies:
-Regular computer paper or sticker paper (I always use sticker paper)
-Bag of Hershey's miniature candy bars
-Bamboo skewers (found in the kitchen supply aisle at Kmart, Walmart, etc near the
spatulas/measuring spoons approx. $2.00)
-Mug or container of your choice (mine is from the dollar store)
-Floral Foam block, cut to fit snug in your mug (purchased mine from a dollar store)
-Low temp Hot Glue
-Shredded paper to cover foam in mug (purchased mine from a dollar store)
-Pre-curled ribbons (Like you attach to gifts - I bought 3 curled gift bows for a $1
at a dollar store), in my baby sample above, I used 19 of them.
Assembling instructions:
1. Start with a 2.57" x 1.51" canvas, 300dpi. Odd size, I know, but trust me, this
is the size of my wrappers. Create your candy wrappers to your liking. I
create some sort of borders on my wrapper and save that one as my "base". Then
I add an alphabet letter to the base and save as wrapper ______ (insert letter
here). Delete that layer and add your next letter to the base. Save as wrapper
_____ (insert next letter here). Do the same with any elements you want on your
wrappers.
2. Open an 8.5 x 11 300dpi canvas. Position as many of your wrappers on here as
you can to create a full page of wrappers for easier printing. I used full
sized label paper to print on.
3. Print and let sit for about 15 minutes. Cut labels and wrap each candy bar.
Center letter or image on front of mini candy bar and then wrap edges to the
back of bar. If using paper, wrap label around candy bar and tape to the back
of bar. Foil edges of mini candy bar will be visible when the candy bar is
wrapped.
4. Working quickly and on one candy bar at a time, apply a stripe of hot glue down
the middle of the back of the candy bar. Start at the top of the backside of
the candy bar and apply the glue to the bottom on the backside of the candy
bar. Lay a wooden skewer in the glue while it's still hot. Position the wooden
skewer so that the tip is very close to the top of the candy bar, but not
showing at the top. This will give it a better hold when it is put in the mug.
Let dry completely.
5. Fit your styrofoam block/shape to your mug/container. You will want a snug
fit. I had to cut additional wedges of foam to make it fit snugly. Apply some
hot glue to the foam and cover the foam with some shredded paper, if you
desire. I did half of the surface, added paper and then did the other half.
But don't use too much or it will be hard to push your wood sticks into the mug.
6. Hot glue your curling ribbons to the bottom of each candy bar in front of the
stick. (Play around a little to see how you want the ribbon to look before hot
gluing it in place) I put curling ribbon on each skewer. Allow to dry.
7. Arrange your candy bars in your mug/container. Start with your middle row and
center. See photo for reference. Some of the skewers for the front of your
arrangement will need shortened for placement. I did not shorten any of the
skewers for the candy bars at the top of my arrangement.
You can download my supply list and instructions HERE
Enjoy! And most of all, if you create a candy bouquet, please drop me a line so I can see yours!!!
15 comments:
So cute! What a great idea!
Thanks for the instructions. I love this! Will definitly have to try this out.
These are adorable! I'd forgotten you can do this, I should make these more often! Thanks for the great instructions!
Jenn White
www.scrappersworkshop.com
I made one two years ago for my dd's first birthday. Yours is too cute! I love all of the curly ribbon.
oh how stinkin cute is that??! Love it!
Wonderful idea. I love that.
Oh thank you thank you! I have been wanting to make this!
Those look really cool! TFS!
That's a great idea! I'm gonna try this.
wonderful idea! Thanks for sharing!
I LOVE those, how cute!! Thanks for the instructions. :)
Whoo-hoo! You already know I think this is fabulous! I blogged about it today too, AND did your photo tag!!
girl, I am loving those birdies top left! glad to hear your dad is doing fine! keep me updated!
just popped in to let you know you've been tagged ;) - check out my bloggie http://www.scraplantis.com/gabs-blog/
You are awesome! Thanks for the link! Will you be my hybrid hero? :)
Post a Comment