Wednesday, July 28, 2010

2 Sketches 4 You sketch challenge

Happy Wednesday to you!

This week, the Hybrid Chick Caravan has traveled to the 2 Sketches 4 You blog to participate in their sketch challenge. Let's get right to it!

Here is the sketch we're playing along with:


And here's my card based on the sketch - I went a very simple route with my card:

I'm still very much a beginner at all of this stamping stuff. I tried Sylvia's inking technique on the edge of my brown patterned paper and then used a sanding block to distress the edges. She's always very kind to answer questions from this newbie - thanks Sylvia!!!

The flower was created using a new to me technique I found on the Ribbon Flowers blog - I used a wood burning tool to help create this flower.

It's not apparent on the photo but the bottom half of the card is embossed with soft and subtle dots.

Supplies used:
  • Sketch: 2 Sketches 4 You blog
  • Stampin' Up!: Kraft cardstock, brown satin ribbon, button, twine, leaf stamp, corner rounder punch, Swiss dots embossing folder, Big Shot
  • Hampton Art: "thinking of you" foot longs stamps
  • Misc.: tombow adhesive tape runner, Zots adhesive dots, Tim Holtz Distressing ink - Vintage,

So, join the Caravan - use the sketch to create your own card. Upload it to the 2 Sketches 4 You blog and don't forget to link us to your card on the Hybrid Chick Caravan facebook group so we can leave you some luv!

Saturday, July 17, 2010

Taylored Expressions sketch challenge

Happy Saturday everyone! It's a beautiful July summer day here in PA! Good thing because I have a family reunion to go today!

So, Thursday I hinted that there was something new coming to The Hybrid Chick - today (hopefully!) all will be revealed. So keep checking over there for the announcement....

I played along with Taylored Expressions sketch challenge #121. Here is their sketch:


The Sketch Crew over there came up with some really beautiful and unique cards based on the sketch. I went a more whimsical route.

Supplies: Happyland digital kit by Madame Wing, Staples double sided matte presentation paper, pop dots, Stampendous! glitter on the wings, Stampin' Up! Embosslits Beautiful wings die, hello stamp from SU! Hello again set, SU! Pixie Pink and Silver metallic inks

My supply of stamps are very limited as I am just starting out. I joined a monthly Stampin' Up! card club which met from last September until June of this year. It was a lot of fun and a great way to be introduced into stamping. I mostly stocked up on tools - punches, inks, sizzlits, etc. Now I wish I had purchased more stamps!!

This card is actually only the very second time I used one of my stamps and ink here at home. I was hesitant to break out the stamps and get them dirty. LOL

I can already see why stamping is addictive - you want more and more choices to use to create! And I'm with Sharyn - I need some Copic markers now!

Thursday, July 15, 2010

Everything but the Kitchen Sink sketch challenge #19

Well, as far as creating cards, I've had a dry spell with the ole mojo.

But as soon as I saw the card sketch challenge posted on Everything but the Kitchen Sink, the creativity sparked a little!

Here's their sketch:


and here is what I created based on their sketch:

Not bad for my first time paper piecing!!! I used papers from ScrapMuss Designs' Music of my Memories kit from over at ScrapMatters to paper piece the to go cup.


Additional hybrid supplies used: Staples Double sided Matte Presentation paper, Scallop oval Nestibilities,
Sizzix Big Shot, Latte Love stamps from Fiskars, twine, dot rub-ons, black ink and brown ribbon from Stampin' Up!, Tim Holtz' distress ink - vintage photo, pop dots.

and that's it from me for today - but stay tuned (all 1 of my readers LOL) for a new adventure for me and few of my fellow Hybrid Chicks from The Digichick! It'll all be unveiled on Saturday, July 17th on the Hybrid Chick blog!

Curious??? check out The Hybrid Chick on Saturday!!!

Saturday, May 1, 2010

It's a ScrapMatters iNSD Blog Train

Just a very quick posting from me this morning!

If you are here for the Blog Train - Welcome!!You should be arriving from Amber's stop on the train http://ambersscrapspot.blogspot.com/ .

If you have arrived here and haven't been following the train, make sure you go to the ScrapMatters blog to start the train so that you aren't missing any of the goodies that will be available on this train!

Here is the preview of my blog train stop freebie:

*Sorry - but the blog train is over and the link has been removed*

This freebie coordinates with the printable that I created using the ScrapMatters Design Team collab "Moments that Matter"


The printable set that the Hybrid Team and Designers put together as a Free with Purchase:


I call my printable a "Will you be my....?" box - I thought it would be a super cute way for the Bride-to-Be to ask her friends or family to be her bridesmaid/maid of honor/matron of honor. My blog freebie could be printed out and added to the top of the box to "pop" it off to make it more 3D.

The box from the outside:


and here's what the inside would look like assembled:


This was really easy to put together and it could be changed to whatever color you'd like just by changing the buttons.

Supplies needed to put this box together: Adhesive of choice, ribbon of choice, buttons of choice, glue dots.

First, print (on your printer's best print settings - I highly recommend Red River paper for printing your projects or Epson Matte Presentation Paper for the best color), cut all pieces and assemble the box.

Punch holes in the journal tabs that spell out "Will you", "be my", "bridesmaid" or other wedding party postion and then the "Say Yes!" tab.

Next, cut a length of ribbon atleast 12 inches long. Slide the journal tabs onto the ribbon and space to your liking. Leave a couple of inches at the top so that you can adhere it to the inside of the box lid with a glue dot.

Then I strung thin twine through the buttons from the front to the back and tied the buttons to the ribbon just above each tab.

Trim the bottom of your ribbon.

And there you have it - a fun way to ask a friend or a family member to take part in your special day!

Hope you enjoy it! Your next stop on the blog train is the Fabulous Jenna http://www.sweetazshooga.com

If you get lost along the way, you can go back and start at the ScrapMatters blog

Saturday, April 10, 2010

Happy Saturday to you!

Hey there - welcome back! I have a few new cards and a project to share with you today.

First up is this card I created using Wimpychompers Creations' You Make Me Bananas kit and a border from Britt-ish Designs' Doodlie-Do Page Borders (which I use ALL the time on my projects!!!!)


Next up is another card I created using a new technique that I found in the resource section at Splitcoast Stampers - creating a brick wall. I used ViVa Artistry's Altered: Stoked kit.


This card made it to the Gallery Standouts site - which is indeed an honor!!!

My box of cards that I am making (and collecting at card swaps at my monthly Stampin' Up! card club) is filling up FAST this year!!!

One last project that I have to share with you today is this one - which at first I didn't like how it turned out. But the more I see the photo, the more I like it!


Don't you just love how girly it looks with the maribou?

Tip: use a low temp hot glue gun to attach the maribou to your projects.

Credits for this project are Simply J Studio Fry Box Template and Sya Blueprints and Juno Designs collab A Different Kind of Love

Well, that's it for me on the sunny warm Saturday in PA - it's almost time for the Hockey game! Go Pens!!!

Monday, March 29, 2010

3/29 It's a Blog Hop featuring Kelleigh Ratzlaff Designs!

Oh my....has it really been 4 1/2 months since my last blog post? Yepp...it sure has. What better way to get back into blogging than to join in on a blog hop!!!

Kelleigh Ratzlaff's Creative Team at The Digichick is having a hop (appropriate for this time of the year huh? LOL). There are 22 extremely creative artists joining in on the fun!

One lucky hopper (that's you!) will win a $10 gift certificate to Kelleigh's store just for commenting on her blog post with your vote for your favorite Creative Team project from the hop. One lucky Creative Team member will win $10 in PayPal cash for earning the most votes!! The Blog Hop contest winners will be announced on Thursday, April 8th on Kelleigh's blog.

So, what did I make? Well, one of my favorite things to do is to take a template and "do it" differently than it was intended. Earlier this month on The Hybrid Chick, I turned Kelleigh’s Heart Purse template into a Bridal shower/wedding favor. Make sure you check it out! Almost makes me wish I was getting married again.....almost!!!!

So for Kelleigh's blog hop, I decided to use her Take-Out box template.


I also used Lil Dude by Jennifer Fox, Nikki Epperson, and Melissa Bennett to create my project. I just love the papers in this collab!!!


and here is what I created:


and yes, that really is Kelleigh's Take-Out Box template!!! Wanna know how I made this using that template?

First I opened Kelleigh's large sized Take-Out Box template. I worked with the "lines only" layer - hide or delete all other layers. Next I erased the lines that would create the top flaps of the box. Then I rotated the lines layer on the canvas and enlarged it until it was as wide as my canvas. I copy and pasted the lines only layer onto my patterned paper. I changed to color of my score lines to white by adding a new layer over top of the lines, flood filling the new layer with white and then hitting "control + G" to clip the white to my score lines.

Next, I printed a full 8.5 x 11 sheet (borderless) of the green paper from the kit on Epson Matte Double Sided Presentation Paper. Then I turned the presentation paper over and printed a full sheet (borderless) of the patterned paper along with the lines of Kelleigh's template that I changed as above.

After cutting around the edges of my template, I scored all of my dashed lines and creased my scores. The triangular shaped pieces of the template were scored and folded inward instead of outward. On a regular take-out box, the pieces fold outward and then are folded against the outside of the box. This is what it will look like scored and ready to assemble:


Next, I made a faint pencil mark along the fold of each of the triangular shaped pieces and then used my crop-o-dile to punch the holes.


See above photo to see where I positioned the holes on the template.

Next I took one end of some embroidery thread and threaded it through the holes the whole way around twice ending in the same space I began.


After pulling the strings to form my basket, I tied a knot and snipped the loose ends of the thread close to the knot.


To create the handle, I cut a narrow strip of coordinating paper the length I wanted my handle to be. On both ends of my handle, I folded approx. 1/2 inch to the underside. I then punched holes at each end of the handle for the brads.


Positioning the handle on the tightened embroidery floss in the center of the basket, I added the brads to secure the handle in place. Repeat on opposite side.


To finish my project, I decorated the sides of my box/basket and the handle.


And that's my project for the blog hop! Make sure you check out all the stops on the Blog Hop (just keep in mind that those participating are all over the world and in different time zones so be patient and check back later in the day if a post on the list isn't up!)

Here are your Blog Hop Stops:
Kelleigh
Tracy
Sally
Laura
Juli
Julie
Christy
Dana
LuAnn <---You are here!
Jacinda
ViVa
Dalis
Holly
Sharyn
Karen Lewis
Linda
Alice
Mel
Sunghee
Carolina
Debbie
Kim

Don't forget to go back to Kelleigh's blog and leave a comment at the end of her Blog Hop post with your favorite Creative Team project for a chance to win a $10 gift certificate to Kelleigh's store.

Thanks for stopping by and hope you enjoy the hop!!

Saturday, November 14, 2009

Drive-by Posting today......

Just wanted to do a quick post this morning with my most recent hybrid project that I created for The Hybrid Chick blog.


Head on over and take a peek at how I created one of my most favorite projects so far! I had been thinking about how I wanted to make this for a few weeks now and am stoked with how it turned out! I think the only thing I'd do differently next time is make the inner box bigger.

I'd love to know what you think of my newest project!

that's it for today! Have a good one!

Saturday, November 7, 2009

All Aboard! Take a ride on the ScrapMatters DSD Blog Train!

Welcome to Wildblueeyez Junction - your next stop on the ScrapMatters' Blog Train!
Happy Digital Scrapbooking Day!

So, what one item (kit/element pack/etc) was on your "must-have" list that you picked up today? Please feel free to enable me, especially if it's of the whimsical nature!!! LOL
But you're not really here to enable me, are you?!? Nooooo, you're here to collect the next goodie on the ScrapMatters' blog train.

Did you know that there are 45 stops of scrapbooking goodness waiting for you on the blog train?? Yes, I said 45!!! and the best part? All of the goodies collected along the blog train coordinate with the ScrapMatters' Mega collab kit "A Slice of Life" kit.


To get this GORGEOUS kit, just spend $15 on one order in the ScrapMatters shop and receive the kit FREE!!

Here's my offering for the blog train:


Sorry but the freebie has been removed! But you can purchase all the A Slice of Life freebies in the ScrapMatters store on 11-13-09!

Here's where you came from: Jeni H http://www.jeniscraftyblog.blogspot.com

Here's where you are: LuAnn http://livelaughcreate-luann.blogspot.com/

And before I send you on your way, just a little note to let you know that the freebies along the blog train will only be available for a limited time and then they will be packaged up and available for purchase in the ScrapMatters shop. So make sure you hit all the stops!!

If you get lost along the way, the complete list of stops on the blog train will be listed on the team blog as well as in the forum.

All Aboard! Next stop.... Chia's blog: http://keepingupwiththekunzs.blogspot.com/

Thanks for stopping by!!!

Friday, October 30, 2009

Trick or Treating with the Digichick Designers and Creative Team!

Happy Halloween y'all! Welcome to those of you here for the Trick or Treating!


The Digichick Designers and Creative Team have cooked up some awesome goodies to pass out for the Trick or Treaters! Some are Halloween themed, some are Thanksgiving themed and some are for everyday use.

My treat is the center cluster from this layout (minus the "sweet as sugar" tab and yellow ribbon):


Credits for my cluster freebie:
~Background paper, orange never ending stories wordart, yellow tied ribbon with bows, and orange leaves cluster from Every Life Has a Story - Chapter 1 by the Digichick Designers
~green and blue did you know wordart, swirls, cardboard flowers, and green buttons from Every Life Has a Story - Chapter 2 (part of the TDC Workshop this month)
~Greenery, string, painted hearts, and white papermask from Every Life Has a Story - Chapter 3 (part of the Digi Files #8 for the month of October)

Click HERE to download the psd and png version of the cluster. Hope you enjoy it and can use it!

Here are the rest of the team who are passing out goodies - feel free to visit the blogs in any order. Please keep in mind the different time zones that everyone lives in as they may not post until later in the day.

Tiffany - http://ascrapaway.blogspot.com/
LuAnn - http://livelaughcreate-luann.blogspot.com/ <----You are here!
Cheryl - http://cherylisadomesticgoddess.blogspot.com/
Mel - www.littlepaperhouse.com
Kelley - http://www.kelleymickusdesigns.blogspot.com/
Sinead - http://www.slaphappyandscrappy.blogspot.com
Tracy - http://tracykosofsky.blogspot.com
Pam - www.pameladonnis.com
Elise - http://elisespiecesdesigns.blogspot.com
Jill - http://scrappingprincess.com/blog
Jacinda- http://www.digikiwichick.blogspot.com/
Jenn - http://jennamy82.blogspot.com
Kara - www.karaperrien.blogspot.com
Heather - http://bowenyard.blogspot.com
Juli - http://julifreshfish.blogspot.com/
Mari - http://mydigitalartstudio.com/
Julie - http://mycrazylifeasamomandawife.blogspot.com/
Linda - http://www.yamstamps.com/weblog/treat.html
Dani - http://www.danielleengebretson.com/
Cheryl - http://cherylisadomesticgoddess.blogspot.com/
Kelleigh - http://kelleighratzlaff.com/
ViVa - http://vivaartistry.blogspot.com/
The Hybrid Chick - http://www.thehybridchick.com/

Thanks for stopping by!!!

Saturday, October 10, 2009

Show and Tell and a new Hybrid team!

I'm trying hard to get back into posting regularly on my blog.

In September, I was a guest Hybrid member at ScrapMatters - these are the projects I created during my guest stint:


My month was over quickly but good news! I was asked to stay on as part of the Hybrid Team! Yay!

I'll be hosting the I'll Pencil You in! challenge in the Hybrid forum at ScrapMatters on 10/15. It's a monthly challenge to help everyone get those calendar toppers finished so they can be ready to give as Christmas gifts!

In the meantime, here's a layout I did tonight as part of my ScrapMatters - One of my assigned designers is Stolen Moments:


I used Stolen Moments' Everyday Elegance kit:


Isn't it gorgeous!

That's it for me tonight! I'll see you in a few days with some more layouts and projects!

Catch you on the flip side!

Friday, October 2, 2009

Be Inspired! Ride along with Kelleigh Ratzlaff's blog hop!

Hey everyone! Long time no post! Yes, I know... I am hanging my head in shame over it. It's so easy to get in the habit of regularly posting but even easier to get OUT of the habit.

I'm posting today as part of a Blog Hop with Kelleigh Ratzlaff's Creative Team. What's a blog hop some of you may ask? Blog hop, also known as blog hopping is to move from one blog after another to read the entries, to leave comments and most of all....be inspired!

I'm very fortunate to be able to work with Kelleigh Ratzlaff's designs. Kelleigh creates the best Hybrid templates for The Digichick.

All of Kelleigh's templates are easy to use! You just print on regular sized 8.5 x 11" paper. Her templates come with a "lines only" pdf files for printing on traditional scrapbook paper and cardstock, as well as the standard png and photoshop files for use with digi papers.

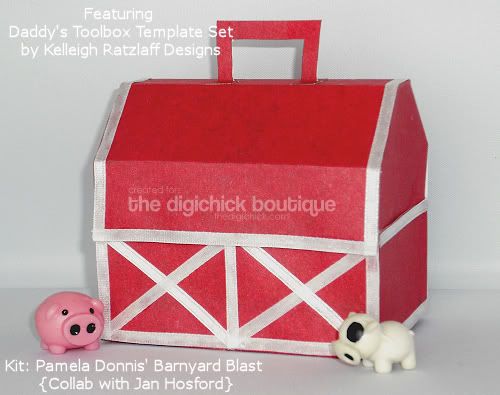
Now for my project.... When Kelleigh released this template a weeks ago, I saw it differently than the her CT members. The template I am talking about is her Daddy's Toolbox template set:


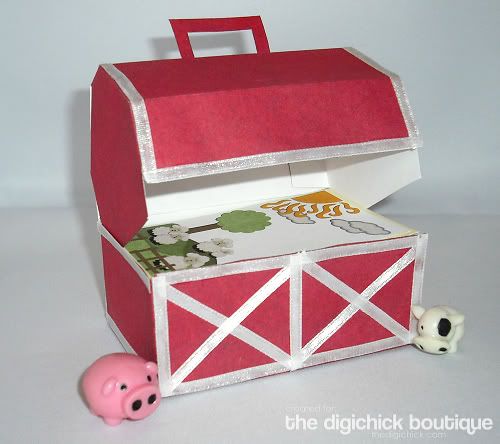
Here's what I saw (and finally made!):


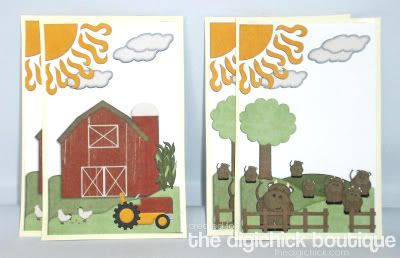
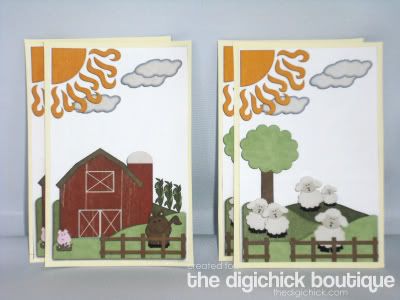
These are Memory game cards that I made using Pamela Donnis' and Jan Hosford's collab Barnyard Blast kit. The cards are sized and fit perfectly in the barn!


The barn was created using a paper from the Barnyard Blast kit. After I printed my barn, I glued narrow white ribbon around the barn for my trim. The cards are the size of a standard playing card - 2.25" x 3.5". Once I created my sets of cards, I simply printed them out on paper, cut and glued them to colored cardstock to make them sturdier. (Thanks to Kari *karistamps* for posting the idea of creating a memory card game and using cardstock to make them sturdier!)

So, as you head off to see what Kelleigh's CT is up to, remember that a template is just that - a template. It's meant to fuel your imagination and creativity!

Here's the list of who is participating in the blog hop - go and be inspired!!!
Kelleigh
Tracy
Julee
Julie
Juli
Christy
Dana
Sunghee
Laura
LuAnn you are here!

Kelleigh is giving away the Perfect Pumpkin Template to one lucky person who comments on her blog so make sure you leave her a comment!!!


How cool is that? Good luck and thanks for stopping by! Oh, and I'm impatient - so my post is up. Most others have their blogs set to post Friday morning sometime.

Monday, July 6, 2009

Another FOBTY and Hybrid Baby Shower favors!!

So, I've been looking to re-decorate my blog. There's so many cool digital kits out there that would make awesome blog-ware! I think the reason I haven't blogged much lately is because *gasp* dare I say it.... the pink is getting old!!! Any suggestions?

Part of my blog post today is for the Sweet Shoppe's FOBTY "What flavor smoothie are you?" Here are my results:


You Are a Banana Smoothie


You are friendly and popular without even trying to be. People just like you.

You are easy to be around and never offend everyone. You're quite mild.


You have a warm demeanor, and many people find you to be inviting.

You are sympathetic and kind. You have a soft spot in your heart for everyone.


LOL ok....let's dissect this a bit shall we???

You are friendly and popular without even trying to be. (Um I'm kinda shy and use my smart a$$ sense of humor)
People just like you. (not really. most are put off by my smart a$$-ness)
You are easy to be around and never offend everyone. (LOL I think I offend a lot of people because I'm blunt and matter of a fact about it)
You're quite mild. (not in this lifetime!)

You have a warm demeanor, and many people find you to be inviting. (see above! LOL)
You are sympathetic and kind. (for the elderly - most definately!)
You have a soft spot in your heart for everyone. (except the dumb a$$es out there!)

Not real accurate but fun!!! LOL

On the creative side, things have been in a spiral downward. Stress at work has squashed any creative spark I have. We hosted a 2 week long baby shower on The Hybrid Chick blog the last two weeks of June and boy did we have some awesome projects! Head on over to see what we gifts we created!

For my day, I created the baby shower favors. Here's what I created:


Credits HERE


Credits HERE

And this was my doorprize - a random poster won up to 100 of these ready-to-fill baby shower favors (minus the hanging tag) with laces in color of the winner's choice.


Credits HERE

Congrats to Judy S - who is planning an August baby shower for her daughter-in-law! I'll be working on getting these out to her by the end of the month!

and that's about it for today! thanks for stopping by!