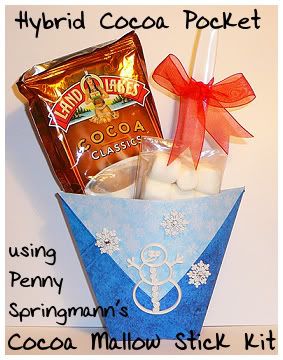

I came across these little cocoa holders while blog hopping. The idea and inspiration came from Barbara Schram's stamping blog here. Her cocoa packets are AMAZING!!! She was so very kind to post links to the instructions for the paper cup(which I will refer to as the pocket LOL). I think she must have used 12 x 12 sized papers - some were done with double sided papers too because her pockets were bigger than mine turned out.
So, I set about making a digital version and here's how I did mine.
In Photoshop, I opened 2 papers from Penny's Cocoa Mallow Stick kit - the brilliant blue called out to me so I chose it and then did color replacement to change the snowflake paper from neon green to a light blue color. I resized my papers to 8 x 8 and layered them on top of each other on a blank 8.5 x 11" 300dpi canvas.
Now here's where it was a bit tricky. I needed to print one of my 8x8 papers on each side of my white printer paper so that I ended up with a double sided square. I made one of my papers invisible for the first printing. Print on your printers best setting. Allow the ink to dry for a few minutes before you turn that page over and put it back in your paper tray to print on the other blank side. Make sure you feed the same end of the paper into the printer.
**As always, I recommend doing a test print using grayscale (to save ink) to make sure your squares line up back to back when printing. For some reason I had to move one paper just a smidge to one side in order for them to line up perfectly**
In your program, hide the paper layer you just printed and make the other paper layer visible. Print. If you hold your paper up to light, you will be able to see if your squares lined up. Allow ink to dry before handling and folding, otherwise you'll get fingerprints elsewhere on your pocket. *trust me on this!!! LOL)
Cut your square double sided paper. Follow the instrucions for making a paper pocket. (When I folded my points to the opposite side, I touched the point to the edge of the opposite side and then eyeballed the other side to make sure it was going to look right). Once I was happy with how it looked, I made my folds and creased them with my fingers tips.
I (like Barbara) folded my flaps to the outside of my pocket instead of tucking them
in. I used a glue dot under the edge of the diagonal fold and also under the point of the folded down pieces to hold my pocket together. Boo hoo - I was out of my Xyron tape runner!
Embellish as you desire. I used glue dots to adhere my embellishments. Add a packet of cocoa (or baggie of homemade cocoa), some mini marshmallows, and of course a spoon! If my pockets were bigger, I would have tossed some mini chocolate chips and/or some colorful sprinkles in baggies in there too! Jewelry bags would have made for a better presentation.
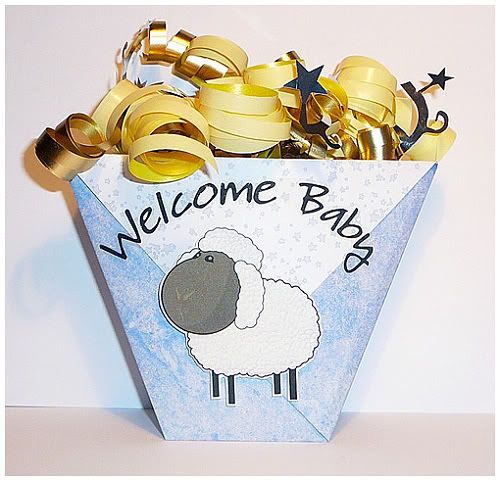
And here's one I did for a baby shower favor - add some shower mints and you're all set!
Wouldn't these be super cute to pass out for Valentine's day??? My daughter asked me if these were Chinese cups - as she knows how to fold paper to make these. So I'm thinking these would be a fun project to get the kids involved in!
I'd love to see your version of these - so drop me a line if you make some!!!
8 comments:
What a cute project. You always have such wonderful hybrid projects.
wow, luAnn, again such a wonderful project! You do such great job with these! I wish I would be as good as you!
really adorable! i love this idea!
oh those are so sweet
I love the ideas have to try them with the kids....
I love hybrid tutorials. Thanks for the inspiration.
Ohh very cute... maybe I'll do it too!!!
LuAnn, Thank you so much for sharing with us how you made your Hybrid Cocoa Pockets! I can't wait to try them....I absolutely love your hybrid creations....You never seem to amaze me!
Oooh these are really effective! Such a great project and so versatile, please blog more - I need some more hybrid inspiration!!
Post a Comment